Coleman Mach Thermostat Wiring Guide And Manuals
If you’re looking at a mess of wires and a new Coleman Mach thermostat, wondering how to connect everything, you’re not alone!
Wiring a thermostat can feel overwhelming, especially with something specific like the Coleman Mach thermostat.
But don’t worry—we’re here to make it easy. In this guide, we’ll walk you through everything from basic thermostat wiring to the details of the Coleman Mach wiring diagram.
Understanding the Coleman Mach Thermostat
The Coleman Mach thermostat is an important part of your RV’s air conditioning system. It helps control the temperature and ensures your RV stays comfortable, no matter where you go.
Here’s a quick overview:
- Coleman Mach: Known for making reliable air conditioners and thermostats for RVs.
- Compatibility: The Coleman Mach thermostat works with specific Coleman Mach air conditioner models.
If you’re working with a Coleman Mach thermostat, it’s important to understand how it connects to your system for proper setup.
Coleman Mach Thermostat Operation
Coleman Mach Thermostat Manual
Wiring Basics for Thermostats
Before diving into the specifics of the Coleman Mach thermostat, let’s cover some basic thermostat wiring principles.
What You Need:
- Wire Strippers: For handling and preparing wires.
- Screwdrivers: To secure the thermostat and its components.
- Multimeter: To measure electrical properties and troubleshoot issues.
Key Components:
- Thermostat Wires: These connect the thermostat to your air conditioning unit.
- Wiring Diagram: A visual guide to ensure correct connections.
Understanding these basics will make it easier to follow the specific instructions for the Coleman Mach thermostat.
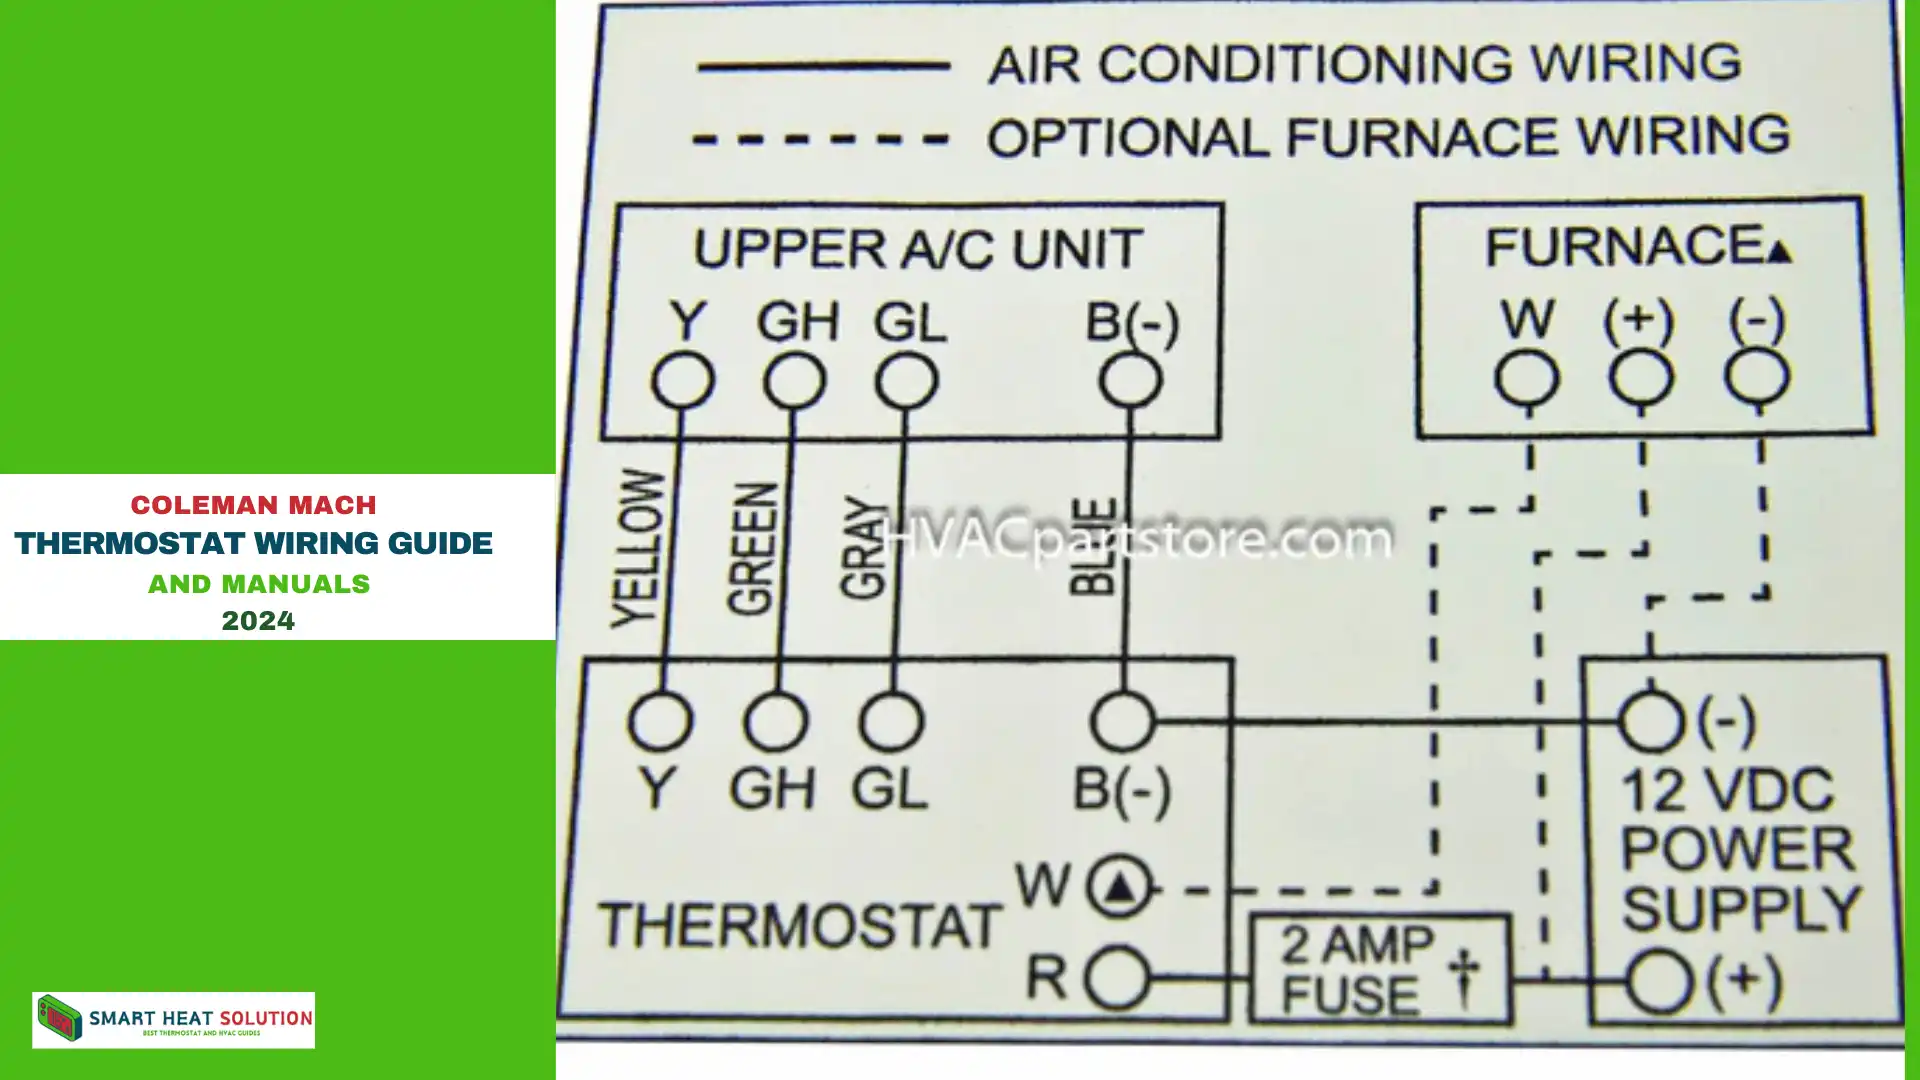
Coleman Mach Thermostat Wiring Diagram
Now that you know the basics, let’s dive into how to wire your Coleman Mach thermostat.
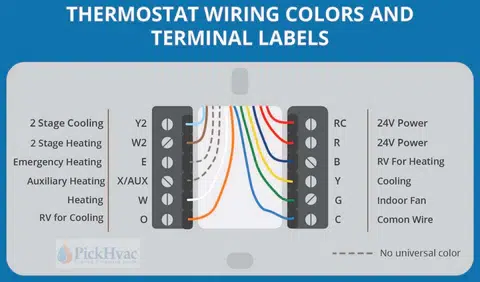
Wiring Diagram Overview:
- Red Wire: Connects to the 24V power source.
- Green Wire: Controls the fan.
- Yellow Wire: Connects to the cooling system.
- White Wire: Controls the heating system (if your system has heating).
Make sure each wire is connected correctly according to the Coleman Mach thermostat wiring diagram to ensure everything works properly.
Step-by-Step Wiring Instructions
Let’s break down the process of wiring your Coleman Mach thermostat.
Tools You’ll Need:
- Wire strippers
- Screwdrivers
- Multimeter
Steps to Follow:
- Turn Off the Power
Always begin by turning off the power to your RV’s air conditioning system. This keeps things safe during installation. - Remove the Old Thermostat
If you’re replacing an old thermostat, carefully take it off the wall. Take note of how the wires are connected, and feel free to take a photo for reference. - Prepare the Wires
Use the wire strippers to remove a small section of insulation from the ends of each wire. You’ll want to expose enough wire to make a solid connection. - Connect the Wires
- Red Wire: Connect this wire to the 24V power terminal on the Coleman Mach thermostat.
- Green Wire: Attach this wire to the fan terminal.
- Yellow Wire: Connect this wire to the cooling terminal.
- White Wire: If your system has heating, connect this to the heating terminal.
- Secure the Thermostat
Once all the wires are connected, mount the thermostat on the wall using the screws provided. Double-check that all the wires are securely fastened. - Turn On the Power and Test
Turn the power back on to your RV’s air conditioning system. Test the thermostat by checking each function (cooling, heating, and fan) to make sure everything is working properly.
Troubleshooting Common Issues
If something isn’t working right, here’s how to troubleshoot:
- No Power: Make sure the red wire is securely connected to the 24V power source.
- Fan Not Working: Check the connection of the green wire.
- Cooling or Heating Not Working: Verify that the yellow and white wires are correctly connected.
A multimeter can help you check if all the connections are live and working properly.
Installation Tips and Best Practices
To make sure your thermostat is installed correctly, keep these tips in mind:
- Double-Check Connections: Before mounting the thermostat, confirm that all the wires are properly connected and secure.
- Follow the Wiring Diagram: Always refer to the Coleman Mach thermostat wiring diagram. It will guide you through the process and ensure you connect everything properly.
- Safety First: Turn off the power before starting any installation work to avoid electrical hazards.
- Consult a Professional: If you’re unsure about any part of the process, it’s always a good idea to reach out to a professional to avoid mistakes.
Coleman Mach Thermostat Wiring Guide: Troubleshooting and Tips
Having trouble wiring your Coleman Mach thermostat? Don’t worry—let’s break it down so you can get your RV’s air conditioning system up and running.
Common Wiring Issues and Fixes
1. Thermostat Not Turning On
If your Coleman Mach thermostat isn’t powering up, it’s likely a power issue.
- Check the Red Wire: Make sure the red wire is securely connected to the 24V power terminal.
- Inspect the Power Source: Ensure that your RV’s power source is working properly and providing power.
2. Fan Not Running
If the fan isn’t working, it’s usually a wiring issue.
- Green Wire Connection: Double-check that the green wire is connected to the fan terminal.
- Test the Fan: Use a multimeter to check if the fan is receiving power.
3. Cooling or Heating Not Working
If cooling or heating isn’t functioning correctly, follow these steps:
- Yellow Wire: Ensure the yellow wire is correctly connected to the cooling terminal.
- White Wire: If your RV has heating, make sure the white wire is properly connected to the heating terminal.
FAQ: Coleman Mach Thermostat Wiring Guide
Q: How do I know if my thermostat wiring is correct?
A: Use the Coleman Mach thermostat wiring diagram. Ensure each wire is connected as per the diagram.
Q: What if my thermostat doesn’t turn on after wiring?
A: Check the red wire connection to the 24V power source and make sure the power is on.
Q: My fan isn’t working, what should I do?
A: Inspect the green wire connection and test it with a multimeter to ensure it’s receiving power.
Q: Why is my cooling not working?
A: Ensure the yellow wire is properly connected to the cooling terminal and test for power.
Q: What should I do if my heating system isn’t functioning?
A: Verify the white wire is connected to the heating terminal and test the connection.

I’m Alan William’s, the founder of SmartHeatSolution.com. I am from California, USA, I’m passionate about innovative heating technologies and their impact on our homes and businesses. With a background in electrican and home repair , I aim to make smart, energy-efficient heating accessible to everyone. When I’m not writing, I’m likely interested in all the thermostat brands and their new technnology. Thanks for stopping by!

